Replacing an Ubiquiti EdgeRouter Lite 3 flash drive

Wow, it’s been a while since I’ve dropped by here. But it’s all worth it as I want to share my experience in replacing my Ubiquiti EdgeRouter Lite 3 flash drive. It has been a rather long journey, so I thought I’d share my experience.

I will not enter into all the technical details but here is a rough list of what I used. This was done on a laptop running with Ubuntu Bionic.

  • A USB to RJ-45 console cable
  • minicom with the suggested setup from the official doc (115200-8bits-No parity-1 stop)
  • tftpd-hpa : the tftp server

Diagnostic

Coming back from my summer vacation, I found my ERL 3 no longer working. After trying the official documentation and seeing that no IP address was set on ports ETH0 / EHT1  as outlined in the doc, I elected to check the console port.

My first try gave me this :

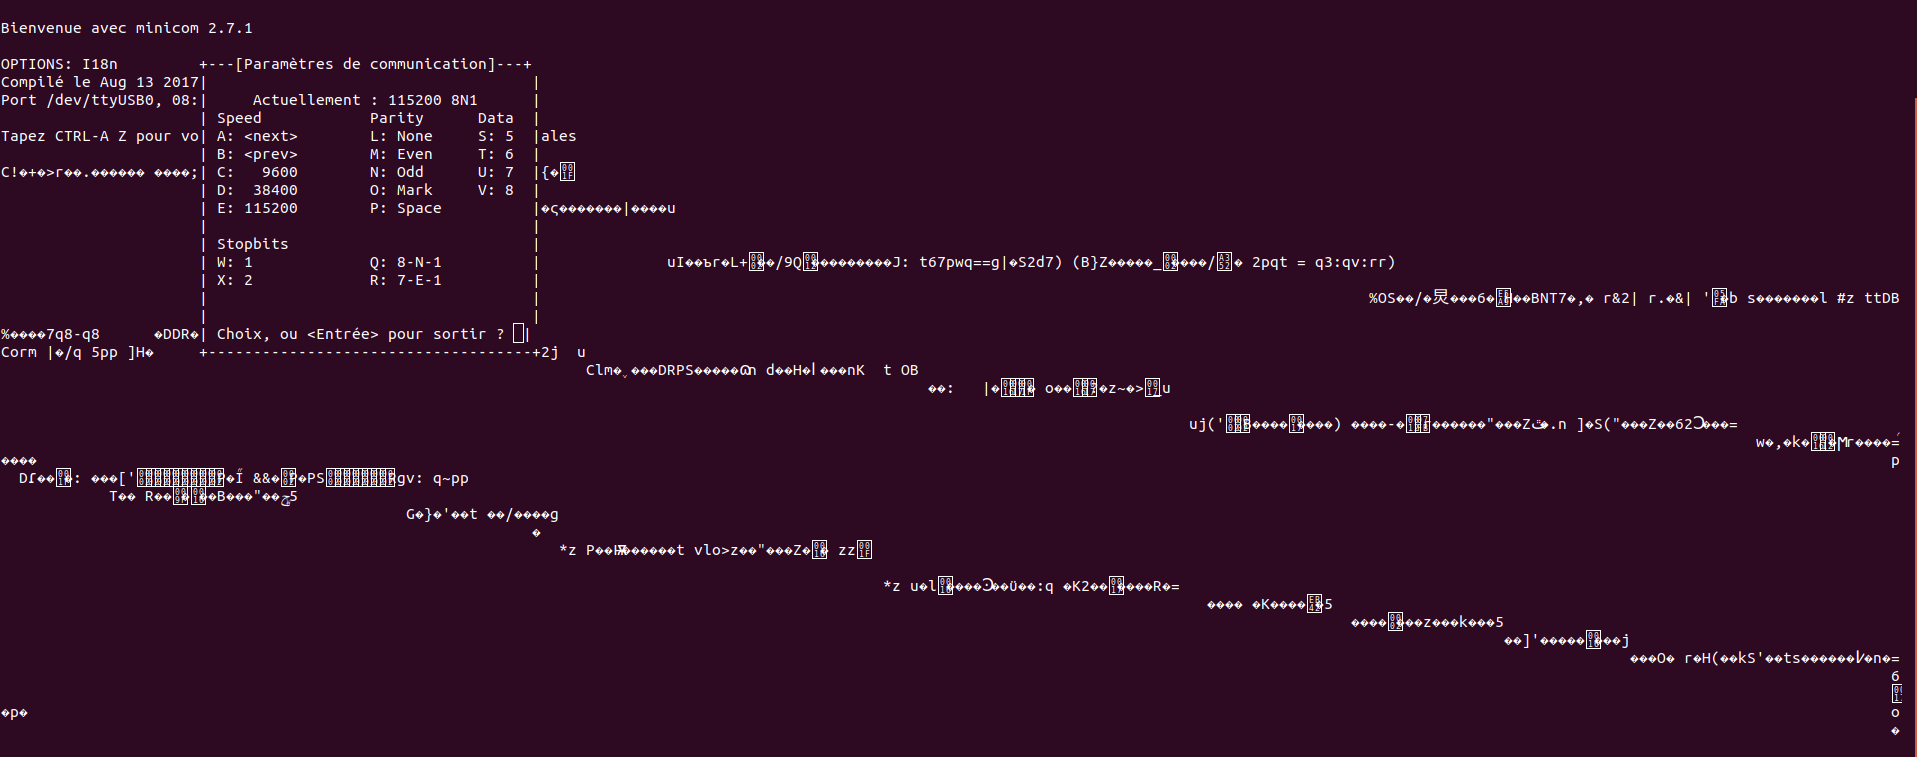
For some reason, only garbage came out of the console port. An hour of googling lead me to believe that the USB console cable was the culprit. A colleague lent me another cable and I got this which was already much better :

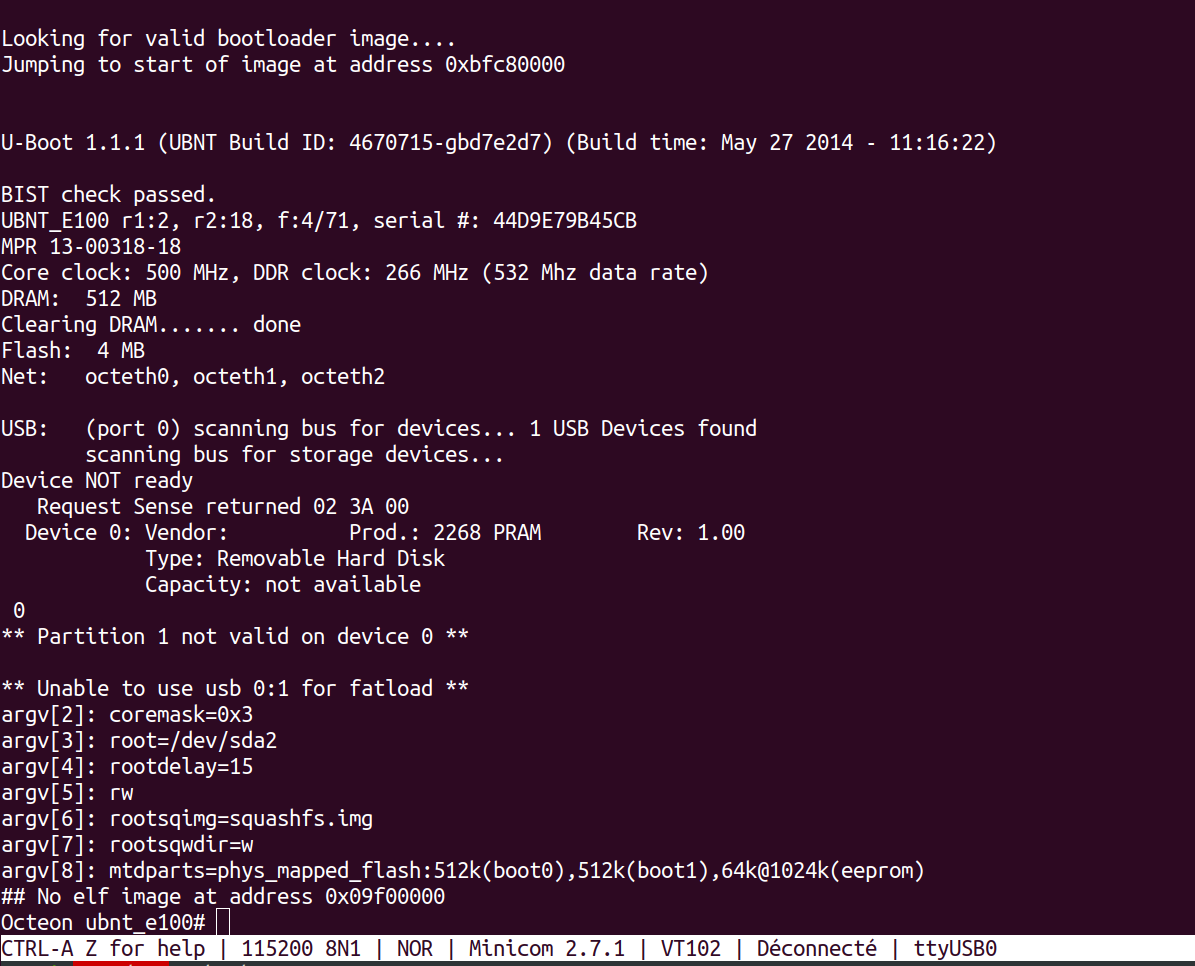
At this point, I should have been a bit more attentive on the message displayed. I got distracted by the fact that some USB Device was seen by the firmware as seen in :

USB: (port 0) No USB devices found.
0

The next two lines clearly indicated that the firmware was not able to access the partitions on the flash drive :

** Partition 1 not valid on device 0 **

** Unable to use usb 0:1 for fatload **

Setting up the TFTP server

This is not the topic of this article, but in short, on Ubuntu you need to install the tftpd-hpa package and you are all set. The image files to be served by TFTP are to be copied in /var/lib/tftpboot.

Identifying the real problem

After some more googling, I found this very good article that, while not being specific on the flash drive replacement, explains very well how to use a TFTP server to load : Recovering an unresponsive Ubiquiti EdgeRouter Lite router. My own article uses portion of this post so I am very thankful to Darren Scott for writing this.

For me, the most useful instructions on this article is how to set the Ubiquiti firmware to be able to fetch a file using tftp. Remember that, so far, I have not been able to reach my router on the network. Even setting up my laptop nic with a 192.168.1.10 ip address did not let me reach the supposed 192.168.1.20 ip address configured on the ETH0 port of the router. I supposed that this is setup by the Ubiquiti firmware stored on the flash drive. Using the following commands, I was able to trigger a TFTP download from my laptop :

# set ipaddr 192.168.1.20
# set netmask 255.255.255.0
# set serverip 192.168.1.10
# set bootfile ER-e100.recovery.v2.0.6.5208553.190708.0607.16de5fdde.img.signed
# tftpboot

I tried his method using the ERLite-3 / ERPoE-5 (e100) image proposed in the official documentation but got the following :

Octeon ubnt_e100# set ipaddr 192.168.1.20
Octeon ubnt_e100# set netmask 255.255.255.0
Octeon ubnt_e100# set serverip 192.168.1.10
Octeon ubnt_e100# set bootfile ER-e100.recovery.v2.0.6.5208553.190708.0607.16de5fdde.img.signed
Octeon ubnt_e100# tftpboot
Interface 0 has 3 ports (RGMII)
Using octeth0 device
TFTP from server 192.168.1.10; our IP address is 192.168.1.20
Filename 'ER-e100.recovery.v2.0.6.5208553.190708.0607.16de5fdde.img.signed'.
Load address: 0x9f00000
Loading: octeth0: Up 1000 Mbps Full duplex (port 0)
#################################################################
#################################################################
#################################################################
#################################################################
#################################################################
#################################################################
#################################################################
#################################################################
#################################################################
#################################################################
######
89 MB received
#################################################################
#################################################################
########
done
Bytes transferred = 113549500 (6c4a0bc hex), 7316 Kbytes/sec
WARNING: Data loaded outside of the reserved load area, memory corruption may occur.
WARNING: Please refer to the bootloader memory map documentation for more information.

The indication WARNING: Data loaded outside of the reserved load area, memory corruption may occur. Made me think that the image was too big to fit in the boot memory section. So this was not the solution.

Finding the EdgeMax Rescue Kit

Darren Scott’s blog post refers to another Ubiquiti Community post called EdgeMax rescue kit (EMRK). This is the kit used to reset the router in Darren’s article. Unfortunately, the links given to download EMRK are all dead. After some research, I was able to locate this EMRK download link : https://downloads.vyos.io/?dir=tools/emrk/0.9c. Let’s home that is remains available.

Using this image, I was able to get the EMRK running but still no luck in reinstalling the firmware.
 

Replacing the flash drive

During my hours of googling, I read a few articles on replacing the Ubiquiti flash drive. So I decided to crack the router open and see what I find. Opening the ERL 3 is rather simple : just remove the three screws on the side of the router where the AC connector is and that’s it.
 
There is a silver USB connector that hosts the USB flash drive.
 
Just remove this original one and replace it with a new flash drive with sufficient capacity. Mine is an 8 Gb USB drive.
Once this is done, put the router cover back in place and secure it with the three screws. Plug back the console RJ45 cable along with the network cable connecting the system where you have installed the TFTP server.
 

Reinstalling Ubiquiti firmware

The rest of the procedure is identical to what is described in Darren Scott’s blog but I will repeat it here :
 
Looking for valid bootloader image....
Jumping to start of image at address 0xbfc80000


U-Boot 1.1.1 (UBNT Build ID: 4670715-gbd7e2d7) (Build time: May 27 2014 - 11:16:22)

BIST check passed.
UBNT_E100 r1:2, r2:18, f:4/71, serial #: 44D9E79B45CB
MPR 13-00318-18
Core clock: 500 MHz, DDR clock: 266 MHz (532 Mhz data rate)
DRAM: 512 MB
Clearing DRAM....... done
Flash: 4 MB
Net: octeth0, octeth1, octeth2

USB: (port 0) No USB devices found.
0
** Partition 1 not valid on device 0 **

** Unable to use usb 0:1 for fatload **
argv[2]: coremask=0x3
argv[3]: root=/dev/sda2
argv[4]: rootdelay=15
argv[5]: rw
argv[6]: rootsqimg=squashfs.img
argv[7]: rootsqwdir=w
argv[8]: mtdparts=phys_mapped_flash:512k(boot0),512k(boot1),64k@1024k(eeprom)
## No elf image at address 0x09f00000
Octeon ubnt_e100# set ipaddr 192.168.1.20
Octeon ubnt_e100# set netmask 255.255.255.0
Octeon ubnt_e100# set serverip 192.168.1.10
Octeon ubnt_e100# set bootfile emrk-0.9c.bin
Octeon ubnt_e100# tftpboot
Interface 0 has 3 ports (RGMII)
Using octeth0 device [30/71]
ur IP address is 192.168.1.20
Filename 'emrk-0.9c.bin'.
Load address: 0x9f00000
Loading: octeth0: Up 1000 Mbps Full duplex (port 0)
#################################################################
#############################################
done
Bytes transferred = 15665511 (ef0967 hex), 7369 Kbytes/sec
Octeon ubnt_e100# bootoctlinux $loadaddr
ELF file is 64 bit
Allocating memory for ELF segment: addr: 0xffffffff81100000 (adjusted to: 0x1100000), size 0xe83940
Allocated memory for ELF segment: addr: 0xffffffff81100000, size 0xe83940
Processing PHDR 0
Loading e23d80 bytes at ffffffff81100000
Clearing 5fbc0 bytes at ffffffff81f23d80
## Loading Linux kernel with entry point: 0xffffffff81105ca0 ...
Bootloader: Done loading app on coremask: 0x1
Linux version 2.6.32.13-wau (dmbaturin@v-dev) (gcc version 4.3.3 (Cavium Networks Version: 2_0_0 build 95) ) #81 SMP Tue Jul 23 13:51:58 PDT 2013
CVMSEG size: 2 cache lines (256 bytes)
Cavium Networks SDK-2.0
bootconsole [early0] enabled
CPU revision is: 000d0601 (Cavium Octeon+)
Checking for the multiply/shift bug... no.
Checking for the daddiu bug... no.
Determined physical RAM map:
...

Loading EMRK 0.9a [107/666]
Mounting filesystems
Bringing up eth0
Checking boot partition
Boot partition is missing or has wrong filesystem type!

Checking root partition
Root partition is missing or has wrong filesystem type!

**********************************************
Welcome to EdgeMax Rescue Kit!

This tool is distributed under the terms of
GNU General Public License and other licenses

Brought to you by SO3 Group

WARNING: This tool is not developed, officially
supported or endorsed by Ubiquiti Networks!

Using it may lead to destroying your router
configuration or operating system

Ubiquiti Networks support will not help you
with using it or fixing consequences of
using it.

This tool itself is distributed without any
warranty and authors are not liable for
any damage it may cause

By using this tool you agree you are doing
it at your own risk and understand what
you are doing

*********************************************


Enter 'Yes' to proceed, 'No' to reboot
yes or no: yes

Do you want to configure network via DHCP?
yes or no: no

Do you want to configure network statically?
yes or no: yes
Enter IPv4 address in CIDR format (e.g. 192.0.2.10/24): 192.168.1.20/24
Enter IPv4 gateway address: 192.168.1.1
Enter DNS server address: 192.168.1.1

EMRK provides some scripts for automated
recovery procedures:

emrk-factory-reset -- reset config to factory default
emrk-remove-user-data -- remove all the user data including
config and everything
emrk-reinstall -- reinstall EdgeOS from scratch
(wipes any user data too)

Enter 'reboot' to reboot your router


BusyBox v1.17.1 (Debian 1:1.17.1-8) built-in shell (ash)
Enter 'help' for a list of built-in commands.

ob control turned off
EMRK>emrk-reinstall
WARNING: This script will reinstall EdgeOS from scratch
If you have any usable data on your router storage,
it will be irrecoverably destroyed!
Do you want to continue?
yes or no: yes

Re-creating partition table
Creating boot partition
Formatting boot partition
mkfs.vfat 3.0.9 (31 Jan 2010)
Creating root partition
Formatting root partition
Mounting boot parition
Mounting root partition
kjournald starting. Commit interval 5 seconds
EXT3 FS on sda2, internal journal
EXT3-fs: mounted filesystem with writeback data mode.
Enter EdgeOS image url: tftp://192.168.1.10/ER-e100.v1.10.11.5274249.tar

% Total % Received % Xferd Average Speed Time Time Time Current
Dload Upload Total Spent Left Speed

Unpacking EdgeOS release image
Verifying EdgeOS kernel
Copying EdgeOS kernel to boot partition
Verifying EdgeOS system image
Copying EdgeOS system image to root partition
Copying version file to the root partition
Creating EdgeOS writable data directory
Cleaning up
Installation finished
Please reboot your router

Once this is completed you can reboot your Ubiquiti EdgeRouter Lite 3. After the boot sequence you should see the well known :

Welcome to EdgeOS ubnt ttyS0

By logging in, accessing, or using the Ubiquiti product, you
acknowledge that you have read and understood the Ubiquiti
License Agreement (available in the Web UI at, by default,
http://192.168.1.1) and agree to be bound by its terms.

ubnt login:

Voilà !

Publié dans Non classé | Laisser un commentaire

Announcing the sosreport charm

Introduction

For a while now I have been actively maintaining the sosreport debian package. I am also helping out making it available on Ubuntu.

I also have had multiple requests to make sosreport more easily usable in a Juju environment. I have finally been able to author a charm for the sosreport which will render its usage simpler with Juju.

Theory of operation

As you already know, sosreport is a tool that will collect information about your running environment. In the context of a Juju deployment, what we are after is the running environments of the units providing the services. So in order for the sosreport charm to be useful, it needs to be deployed on an existing unit.

The charm has two actions :

  • collect    : Generate the sosreport tarball
  • cleanup  : Cleanup existing tarballs

You would use the collect action to create the sosreport tarball of the unit where it is being run and cleanup to remove those tarballs once you are done.

Each action has optional parameters attached to it :

homedir  Home directory where sosreport files will be copied to (common to both collect & cleanup actions)
options Command line options to be passed to sosreport (collect only)
minfree Minimum of free diskspace to run sosreport expressed in percent,Megabytes or Gigabytes. Valid suffixes are % M or G (collect only)

Practical example using Juju 2.0

Suppose that you are encountering problems with the mysql service being used by your MediaWiki service (yes, I know, yet one more MediaWiki example). You would have an environment similar to the following (Juju 2.0) :

$ juju status
Model Controller Cloud/Region Version
default MyLocalController localhost/localhost 2.0.0

App Version Status Scale Charm Store Rev OS Notes
mediawiki unknown 1 mediawiki jujucharms 5 ubuntu 
mysql error 1 mysql jujucharms 55 ubuntu

Unit Workload Agent Machine Public address Ports Message
mediawiki/0* unknown idle 1 10.0.4.48 
mysql/0* error idle 2 10.0.4.140 hook failed: "start"

Machine State DNS Inst id Series AZ
1 started 10.0.4.48 juju-53ced1-1 trusty 
2 started 10.0.4.140 juju-53ced1-2 trusty

Relation Provides Consumes Type
cluster mysql mysql peer

Here the mysql start hook failed to start for some reason that we want to investigate. One solution is to ssh to the unit and try to find out. You may be asked by a support representative to provide the data for remote analysis. This is where sosreport becomes useful.

Deploy the sosreport charm

The sosreport charm will be helpful in going to collect the information of the unit where the mysql service runs. In our example, the service runs on unit #2 so this is where the sosreport charm needs to be deployed. So in our example we would do :

$ juju deploy cs:~sosreport-charmers/sosreport --to=2

Once the charm is done deploying, you will have the following juju status :

$ juju status
Model Controller Cloud/Region Version
default MyLocalController localhost/localhost 2.0.0

App Version Status Scale Charm Store Rev OS Notes
mediawiki unknown 1 mediawiki jujucharms 5 ubuntu 
mysql error 1 mysql jujucharms 55 ubuntu 
sosreport active 1 sosreport jujucharms 1 ubuntu

Unit Workload Agent Machine Public address Ports Message
mediawiki/0* unknown idle 1 10.0.4.48 
mysql/0* error idle 2 10.0.4.140 hook failed: "start"
sosreport/1* active idle 2 10.0.4.140 sosreport is installed

Machine State DNS Inst id Series AZ
1 started 10.0.4.48 juju-53ced1-1 trusty 
2 started 10.0.4.140 juju-53ced1-2 trusty

Relation Provides Consumes Type
cluster mysql mysql peer

Collect the sosreport information

In order to collect the sosreport tarball, you will issue an action to the sosreport service, telling it to collect the data :

$ juju run-action sosreport/1 collect
Action queued with id: 95d405b3-9b78-468b-840f-d24df5751351

To verify the progression of the action you can use the show-action-status command :

$ juju show-action-status 95d405b3-9b78-468b-840f-d24df5751351
actions:
- id: 95d405b3-9b78-468b-840f-d24df5751351
 status: running
 unit: sosreport/1

After completion, the action will show as completed :

$ juju show-action-status 95d405b3-9b78-468b-840f-d24df5751351
actions:
- id: 95d405b3-9b78-468b-840f-d24df5751351
 status: completed
 unit: sosreport/1

Using the show-action-output, you can see the result of the collect action :

$ juju show-action-output 95d405b3-9b78-468b-840f-d24df5751351
results:
 outcome: success
 result-map:
 message: sosreport-juju-53ced1-2-20161221163645.tar.xz and sosreport-juju-53ced1-2-20161221163645.tar.xz.md5
 available in /home/ubuntu
status: completed
timing:
 completed: 2016-12-21 16:37:06 +0000 UTC
 enqueued: 2016-12-21 16:36:40 +0000 UTC
 started: 2016-12-21 16:36:45 +0000 UTC

If we look at the mysql/0 unit $HOME directory, we will see that the tarball is indeed present :

$ juju ssh mysql/0 "ls -l"
total 26149
-rw------- 1 root root 26687372 Dec 21 16:36 sosreport-juju-53ced1-2-20161221163645.tar.xz
-rw-r--r-- 1 root root 33 Dec 21 16:37 sosreport-juju-53ced1-2-20161221163645.tar.xz.md5
Connection to 10.0.4.140 closed.

One thing to be aware of is that, as with any environment using sosreport, the owner of the tarball and md5 file is root. This is to protect access to the unit’s configuration data contained in the tarball. In order to copy the files from the mysql/0 unit, you would first need to change their ownership :

$ juju ssh mysql/0 "sudo chown ubuntu:ubuntu sos*"
Connection to 10.0.4.140 closed.

$ juju ssh mysql/0 "ls -l"
total 26149
-rw------- 1 ubuntu ubuntu 26687372 Dec 21 16:36 sosreport-juju-53ced1-2-20161221163645.tar.xz
-rw-r--r-- 1 ubuntu ubuntu 33 Dec 21 16:37 sosreport-juju-53ced1-2-20161221163645.tar.xz.md5
Connection to 10.0.4.140 closed.

The files can be copied off the unit by using juju scp.

Cleanup obsolete sosreport information

To cleanup the tarballs that have been previously created, use the cleanup action of the charm as outlined here :

$ juju run-action sosreport/1 cleanup
Action queued with id: 3df3dcb8-0850-414e-87d5-746a52ef9b53

$ juju show-action-status 3df3dcb8-0850-414e-87d5-746a52ef9b53
actions:
- id: 3df3dcb8-0850-414e-87d5-746a52ef9b53
 status: completed
 unit: sosreport/1

$ juju show-action-output 3df3dcb8-0850-414e-87d5-746a52ef9b53
results:
 outcome: success
 result-map:
 message: Directory /home/ubuntu cleaned up
status: completed
timing:
 completed: 2016-12-21 16:49:35 +0000 UTC
 enqueued: 2016-12-21 16:49:30 +0000 UTC
 started: 2016-12-21 16:49:35 +0000 UTC

Practical example using Juju 1.25

Deploy the sosreport charm

Given the same environment with mysql & MediaWiki service deployed, we need to deploy the sosreport charm to the unit where the mysql service is deployed :

$ juju deploy cs:~sosreport-charmers/sosreport --to=2

Once deployed, we have an environment that looks like this :

$ juju status --format=tabular
[Environment]
UPGRADE-AVAILABLE
1.25.9

[Services]
NAME STATUS EXPOSED CHARM
mediawiki unknown false cs:trusty/mediawiki-5
mysql unknown false cs:trusty/mysql-55
sosreport active false cs:~sosreport-charmers/trusty/sosreport-2

[Units]
ID WORKLOAD-STATE AGENT-STATE VERSION MACHINE PORTS PUBLIC-ADDRESS MESSAGE
mediawiki/0 unknown idle 1.25.6.1 1 192.168.122.246
mysql/0 unknown idle 1.25.6.1 2 3306/tcp 192.168.122.6
sosreport/0 active idle 1.25.6.1 2 192.168.122.6 sosreport is installed

[Machines]
ID STATE VERSION DNS INS-ID SERIES HARDWARE
0 started 1.25.6.1 localhost localhost zesty
1 started 1.25.6.1 192.168.122.246 caribou-local-machine-1 trusty arch=amd64
2 started 1.25.6.1 192.168.122.6 caribou-local-machine-2 trusty arch=amd64

Collect the sosreport information

With the previous version of Juju, the syntax for actions is slightly different. To run the collect action we need to issue :

$ juju action do sosreport/0 collect

We then get the status of our action :

$ juju action status 2176fad0-9b9f-4006-88cb-4adbf6ad3da1
actions:
- id: 2176fad0-9b9f-4006-88cb-4adbf6ad3da1
 status: failed
 unit: sosreport/0

And to our surprise, the action has failed ! To try to identify why it has failed, we can fetch the result of our action :

$ juju action fetch 2176fad0-9b9f-4006-88cb-4adbf6ad3da1
message: 'Not enough space in /home/ubuntu (minfree: 5% )'
results:
 outcome: failure
status: failed
timing:
 completed: 2016-12-22 10:32:15 +0100 CET
 enqueued: 2016-12-22 10:32:09 +0100 CET
 started: 2016-12-22 10:32:14 +0100 CET

So there is not enough space in our unit to safely run sosreport. This gives me the opportunity to talk about one of the parameter of the collect action : minfree. But first, we need to look at how much disk space is available.

$ juju ssh sosreport/0 "df -h"
Warning: Permanently added '192.168.122.6' (ECDSA) to the list of known hosts.
Filesystem Size Used Avail Use% Mounted on
/dev/mapper/ubuntu--vg-root 222G 200G 11G 95% /

We see that there is at least 11Gb available. While it is below the 5% mark, we can change that by using the minfree parameter. Here is its description :

 * minfree : Minimum of free diskspace to run sosreport expressed in percent, 
             Megabytes or Gigabytes. Valid suffixes are % M or G 
            (default 5%)

Since we have 11Gb available, let us set minfree to 5G :

$ juju action do sosreport/0 collect pctfree=5G
Action queued with id: b741aa7c-537d-4175-8af9-548b1e0e6f7b

We can now fetch the result of our command, waiting for at most 600 seconds for the result :


$ juju action fetch b741aa7c-537d-4175-8af9-548b1e0e6f7b --wait=100

results:
 outcome: success
 result-map:
 message: sosreport-caribou-local-machine-1-20161222153903.tar.xz and sosreport-caribou-local-machine-1-20161222153903.tar.xz.md5
 available in /home/ubuntu
 status: completed
 timing:
 completed: 2016-12-22 15:40:01 +0100 CET
 enqueued: 2016-12-22 15:38:58 +0100 CET
 started: 2016-12-22 15:39:03 +0100 CET

Cleanup obsolete sosreport information

As with the previous example, the cleanup of old tarballs is rather simple :

$ juju action do sosreport/0 cleanup
Action queued with id: edf199cd-2a79-4605-8f00-40ec37aa25a9
$ juju action fetch edf199cd-2a79-4605-8f00-40ec37aa25a9 --wait=600
results:
 outcome: success
 result-map:
 message: Directory /home/ubuntu cleaned up
status: completed
timing:
 completed: 2016-12-22 15:47:14 +0100 CET
 enqueued: 2016-12-22 15:47:12 +0100 CET
 started: 2016-12-22 15:47:13 +0100 CET

Conclusion

This charm makes collecting information in a juju enviroment much simpler. Don’t hesitate to test it and please report any bug you may encounter.

Publié dans Cloud, Juju, Technical, Ubuntu Server | Laisser un commentaire

gtimelog power usage

gtimelog is a great tool to keep track of the time you spend  on your work. To me, its major advantage is to log the time at the end of the task and not at the beginning.

The format of the entry should be : {Category} : {Task}

It has a useful reporting functionality that will craft an email with the details of your tasks with the time spent on each one.  When used with the format described above, the reporting will be done according to each {Category} and a summary of the categories with the sum of the time spent on each.

The GUI is very simple :

gtimelog1

There is one line at the bottom that let you enter the task  you  have just completed.  Tasks are logged in a flat text file so it is very simple to use.

Command Line Interface (CLI) helper : tl.py

Since I spend most of my time using the CLI in a shell environment, I thought that it would be useful to log my gtimelog entries using a one line command.  So I wrote a simple python script called tl.py that will add one entry in the gtimelog log file with the correct timestamp format.

You can download the script here : https://github.com/karibou/tl

The other motivation for this script is to maintain the same spelling for each repetitive task, so the accounting remain coherent.  It also avoids to have to retype the same information over and over.

So when I start a new day, I simply let gtimelog know that a new day is starting by typing :

$ tl.py new

This will add the new : Arrived entry in gtimelog.

The categories that I use most frequently are hard coded in the script :

 'ua': 'L3 / L3 support', 
 'up': 'Upstream', 
 'ubu': 'Upstream Ubuntu', 
 'meet': 'Internal meetings', 
 'pers': 'Personal management', 
 'skill': 'Skills building', 
 'know': 'Knowledge transfer', 
 'team': 'Team support', 
 'comm': 'Community Involvment',

You can modify those to your own needs by editing the script.

To list each category available, just use ? as the argument :

$ tl.py ?
Categories : ['comm', 'know', 'meet', 'pers', 'skill', 'team', 'ua', 'ubu', 'up']

When I enter a new task, I simply use the syntax :

$ tl.py ubu : LP1104303 : gtimelog missing icon

ubu corresponds to the category of the task (Upstream Ubuntu) and whatever comes after the colon is the task.

The next time I want to report activity against this task, I simply use the script with the category of the task only and it will list all existing tasks for that category  :

$ tl.py ubu
1) LP1104303 : gtimelog missing icon
2) sosreport CVE-2015-7529
3) nut merge
4) LP: #1318111 - repetitive crashkernel=
5) liblinear library transition
6) makedumpfile packaging
7) LP1506550 - quassel sound bug
8) Xenial upgrade
9) sosreport autopkgtests for SRU
10) LP: #1496317 - kdump OOM killer failure
Select task (0 to exit,<CR> to continue):

Entering the task index number will add a new entry in gtimelog. If more than 10 tasks are available, enter <CR> to continue the listing of the tasks.

Using tl.py from multiple systems

It may be useful to be able to log your activity from multiple systems.  For instance, you may be working off your laptop while travelling and a desktop at home.  One possibility to achieve this is to use Cloud storage services like Dropbox and share the text file that holds your gtimelog tasks.

On Ubuntu, the file is located at $HOME/.local/share/gtimelog/timelog.txt

If you replace this file by a symbolic link to a file stored in the directory shared in the cloud, you can access the same file from different systems.

The Dropbox example

I already have my Dropbox files shared on my laptop so there is a ~/Dropbox directory available.  To host my gtimelog file, I create a gtimelog directory and copy the timelog.txt file there :

$ mkdir ~/Dropbox/gtimelog
$ cp ~/.local/share/gtimelog/timelog.txt ~/.local/share/gtimelog/timelog.bak
$ mv ~/.local/share/gtimelog/timelog.txt ~/Dropbox/gtimelog
$ ln -s ~/Dropbox/gtimelog/timelog.txt ~/.local/share/gtimelog/timelog.txt

By doing using such a configuration on each system where you want to enter gtimelog tasks, you will be able to share your gtimelog data in an easy manner.

Using tl.py on Ubuntu Server

In my specific case, I needed to go one step further : my second system is a server which does not have a graphical interface. Using this[1] blog entry, I was able to setup my server to receive the ./gtimelog/timelog.txt file only by doing a selective sychronization of the gtimelog directory.  The URL for the dropbox_temp file in the blog post is no longer valid but you can download it from github[2] . It only needs to be renamed to dropbox_temp.

[1] Simplify your server using Dropbox, Selective Sync

[2] dropbox_temp script

Publié dans Canonical, Technical | Un commentaire

kdump-tools enhancements to use smaller initrd.img

While testing the upcoming release of Ubuntu (15.10 Wily Warewolf), I ran over a bug that renders the kernel crash dump mechanism unusable by default :

LP: #1496317 : kexec fails with OOM killer with the current crashkernel=128 value

The root cause of this bug is that the initrd.img file that is used by kexec to reboot into a new kernel when the original one panics is getting bigger with kernel 4.2 on Ubuntu.  Hence, it is using too much of the reserved crashkernel memory (default: 128Mb). This triggers the “Out Of Memory (OOM)” killer and the kernel dump capture cannot complete.

One workaround for this issue is to increase the amount of reserved memory to a higher value. 150Mb seems to be sufficient but you may need to increase it to a higher value.  While one solution to this problem could be to increase the default crashkernel= value, it is only pushing the issue forward until we hit this limit once again.

Reduce the size of initrd.img

update-initramfs has an option in its configuration file ( /etc/initramfs-tools/initramfs.conf) that let us modify the modules that are included in the initrd.img file.  Our current default is to add most of the modules :

# MODULES: [ most | netboot | dep | list ]
#
# most - Add most filesystem and all harddrive drivers.
#
# dep - Try and guess which modules to load.
#
# netboot - Add the base modules, network modules, but skip block devices.
#
# list - Only include modules from the 'additional modules' list
#

MODULES=most

By changing this configuration to MODULES=dep, we can sensibly reduce the size of the initrd.img :

MODULES=most : initrd.img-4.2.0-16-generic = 30Mb

MODULES=dep :initrd.img-4.2.0-16-generic = 12Mb

Identifying this led to a discussion with the Ubuntu Kernel team about using a custom crafted initrd.img for kdump. This would keep the file to a sensible size and avoid triggering the OOM killer.

Implementation

The current implementation of kdump-tools already provides a mechanism to specify which vmlinuz and initrd.img files to use when settting up kexec (from /etc/default/kdump-tools) :

# ---------------------------------------------------------------
# Kdump Kernel:
# KDUMP_KERNEL - A full pathname to a kdump kernel.
# KDUMP_INITRD - A full pathname to the kdump initrd (if used).
# If these are not set, kdump-config will try to use the current kernel
# and initrd if it is relocatable. Otherwise, you will need to specify 
# these manually.
#KDUMP_KERNEL=
#KDUMP_INITRD=

If we use those variables, defined to point to a generic value that can be adapted according to the running kernel version, we have a way to specify a smaller initrd.img for kdump.

Building a smaller initrd.img

Kernel package hooks already exists in /etc/kernel/postinst.d and /etc/kernel/postrm.d to create the initrd.img. Using those as templates, we created new hooks that will create smaller images in /var/lib/kdump and clean them up if the kernel version they pertain to is removed.

In order to create that smaller initrd.img, the content of the /etc/initramfs-tools directory needs to be replicated in /var/lib/kdump. This is done each time that the hook is executed to assure that the content matches the original source. Otherwise, their content may diverge if the content of the original directory gets modified.

Each time a new kernel package is installed, the hook will create a kdump specific initrd.img using MODULES=dep. and store it in /var/lib/kdump.  When the kernel package is removed, the corresponding file is removed.

Using the smaller initrd.img

As we outlined previously, the /etc/default/kdump-tools file can be used to point to a specific initrd.img/vmlinuz pair. So we can do :

KDUMP_KERNEL=/var/lib/kdump/vmlinuz
KDUMP_INITRD=/var/lib/kdump/initrd.img

When kexec will be loaded by kdump-config, it will find the appropriate files and load them in memory for future use.  But for that to happen, those new parameter needs to point to the correct file.  Here we use symbolic links to achieve our goal.

Linking to the smaller initrd.img

Using the hooks to create the proper symbolic links turns out to be overly complex. But since kdump-config runs at each boot, we can ask this script to be responsible for doing symlink maintenance.

Symlink creation follow this simple flowchart

kdump-tools_symlink_workflow


This will assure that the symbolic links always  point to the file with the version of the running kernel.

One drawback of this method is that, in the remote eventuality that the running kernel breaks the kernel crash dump functionality, we cannot automatically revert to the previous kernel in order to use a known configuration.

A future evolution of the kdump-config tool will add a function to specify which kernel version to use to create the symbolic link. In the meantime, the links can be created manually with those simple commands :

$ export wanted_version="some version"
$ rm -f /var/lib/kdump/initrd.img
$ ln -s /var/lib/kdump/initrd.img-${wanted_version} /var/lib/kdump/initrd.img
$ rm -f /var/lib/kdump/vmlinuz
$ ln -s /boot/vmlinuz-${wanted_version} /var/lib/kdump/vmlinuz

For those of you interested in nitty-gritty details, you can find the modifications in the following GIT branch :

Update: New git branch with cleanup commit history

https://github.com/karibou/makedumpfile-next/tree/smaller_initrd_final

Publié dans Non classé, Technical, Ubuntu Server | Marqué avec , , , , | Laisser un commentaire

Capturing kernel crash dumps with Juju

A little before the summer vacation, I decided that it was a good time to get acquainted with writing Juju charms.  Since I am heavily involved with the kernel crash dump tools, I thought that it would be a good start to allow Juju users to enable kernel crash dumps using a charm.  Since it means acting on existing units, a subordinate charms is the answer.

Theory of operation

Enabling kernel crash dumps on Ubuntu and Debian involves the following :

  • installing
    • kexec-tools
    • makedumpfile
    • kdump-tools
    • crash
  • Adding the crashkernel= boot parameter
  • Enabling kdump-tools in /etc/default/kdump-tools
  • Rebooting

On ubuntu, installing the linux-crashdump meta-package takes care of all the packages installation.

The crashdump subordinate charm does just that : installing the packages, enabling the crashdump= boot parameter as well as kdump-tools and reboot the unit.

Since this charm enable a kernel specific service, it can only be used in a context where the kernel itself is accessible.  This means that testing the charm using the local provider which relies on LXC will fail, since the charm needs to interact with the kernel.  One solution to that restriction is to use KVM with the local provider as outlined in the example.

Deploying the crashdump charm

the crashdump charm being a subordinate charm, it can only be used in a context where there are already existing services running. For this example, we will deploy a simple Ubuntu service :

$ juju bootstrap
$ juju deploy ubuntu --to=kvm:0
$ juju deploy crashdump
$ juju add-relation ubuntu crashdump

This will install the required packages, rebuild the grub configuration file to use the crashkernel= value and reboot the unit.

To confirm that the charm has been deployed adequately, you can run :

$ juju ssh ubuntu/0 "kdump-config show"
Warning: Permanently added '192.168.122.227' (ECDSA) to the list of known hosts.
USE_KDUMP:        1
KDUMP_SYSCTL:     kernel.panic_on_oops=1
KDUMP_COREDIR:    /var/crash
crashkernel addr: 0x17000000
current state:    ready to kdump
kexec command:
  /sbin/kexec -p --command-line="BOOT_IMAGE=/boot/vmlinuz-3.13.0-65-generic root=UUID=1ff353c2-3fed-48fb-acc0-6d18086d030b ro console=tty1 console=ttyS0 irqpoll maxcpus=1 nousb" --initrd=/boot/initrd.img-3.13.0-65-generic /boot/vmlinuz-3.13.0-65-generic

The next time a kernel panic occurs, you should find the kernel crash dump in /var/crash of the unit that failed.

Deploying from the GUI

As an alternate method for adding the crashdump subordinate charm to an existing service, you can use the Juju GUI.

In order to get the Juju GUI started, a few simple commands are needed, assuming that you do not have any environment bootstrapped :

$ juju bootstrap
$ juju deploy juju-gui
$ juju expose juju-gui
$ juju deploy ubuntu --to=kvm:0


Here are a few captures of the process, once the ubuntu service is started :

Juju environment with one service

Juju environment with one service


Locate the crashdump charm

Locate the crashdump charm


The charm is added to the environment

The charm is added to the environment


Add the relation between the charms

Add the relation between the charms


Crashdump is now enabled in your service

Crashdump is now enabled in your service

Do not hesitate to leave comments or question. I’ll do my best to reply in a timely manner.

Publié dans Cloud, Juju, Ubuntu Server | Laisser un commentaire

Custom partitioning with Maas and Curtin

Introduction

Once in a while, I get to tackle issues that have little or no documentation other than the official documentation of the product and the product’s source code.  You may know from experience that product documentation is not always sufficient to get a complete configuration working. This article intend to flesh out a solution to customizing disk configurations using Curtin.

This article take for granted that you are familiar with Maas install mechanisms, that you already know how to customize installations and deploy workloads using Juju.

While my colleagues in the Maas development team have done a tremendous job at keeping the Maas documentation accurate (see Maas documentation), it does only cover the basics when it comes to Maas’s preseed customization, especially when it comes to Curtin’s customization.

Curtin is Maas’s fastpath installer which is meant to replace Debian’s installer (familiarly known as d-i). It does a complete machine installation much faster than with the standard debian method.  But while d-i is well known and it is easy to find example of its use on the web, Curtin does not have the same notoriety and, hence, not as much documentation.

Theory of operation

When the fastpath installer is used to install a maas unit (which is now the default), it will send the content of the files prefixed with curtin_ to the unit being installed.  The curtin_userdata contains cloud-config type commands that will be applied by cloud-init when the unit is installed. If we want to apply a specific partitioning scheme to all of our unit, we can modify this file and every unit will get those commands applied to it when it installs.

But what if we only have one or a few servers that have specific disk layout that require partitioning ?  In the following example, I will suppose that we have one server, named curtintest which has a one terabyte disk (1 TB) and that we want to partition this disk with the following partition table :

  • Partition #1 has the /boot file system and is bootable
  • Partition #2 has the root (/) file system
  • Partition #3 has a 31 Gb file system
  • Partition #4 has 32 Gb of swap space
  • Partition #5 has the remaining disk space

Since only one server has such a disk, the partitioning should be specific to that curtintest server only.

Setting up Curtin development environment

To get to a working Maas partitioning setup, it is preferable to use Curtin’s development environment to test the curtin commands. Using Maas deployment to test each command quickly becomes tedious and time consuming.  There is a description on how to set it up in the README.txt but here are more details here.

Aside from putting all the files under one single directory, the steps described here are the same as the one in the README.txt file :

$ mkdir -p download
$ DLDIR=$(pwd)/download
$ rel="trusty"
$ arch=amd64
$ burl="http://cloud-images.ubuntu.com/$rel/current/"
$ for f in $rel-server-cloudimg-${arch}-root.tar.gz $rel-server-cloudimg-{arch}-disk1.img; do wget "$burl/$f" -O $DLDIR/$f; done
$ ( cd $DLDIR && qemu-img convert -O qcow $rel-server-cloudimg-${arch}-disk1.img $rel-server-cloudimg-${arch}-disk1.qcow2)
$ BOOTIMG="$DLDIR/$rel-server-cloudimg-${arch}-disk1.qcow2"
$ ROOTTGZ="$DLDIR/$rel-server-cloudimg-${arch}-root.tar.gz"
$ mkdir src
$ bzr init-repo src/curtin
$ (cd src/curtin && bzr  branch lp:curtin trunk.dist )
$ (cd src/curtin && bzr  branch trunk.dist trunk)
$ cd src/curtin/trunk

You now have an environment you can use with Curtin to automate installations. You can test it by using the following command which will start a VM and run “curtin install” in it.  Once you get the prompt, login with :

username : ubuntu
password : passw0rd

$ sudo ./tools/launch $BOOTIMG --publish $ROOTTGZ -- curtin install "PUBURL/${ROOTTGZ##*/}"

Using Curtin in the development environment

To test Curtin in its environment, simply remove  — curtin install “PUBURL/${ROOTTGZ##*/}” at the end of the statement. Once logged in, you will find the Curtin executable in /curtin/bin :

ubuntu@ubuntu:~$ sudo -s
root@ubuntu:~# /curtin/bin/curtin --help
usage: main.py [-h] [--showtrace] [--verbose] [--log-file LOG_FILE]
{block-meta,curthooks,extract,hook,in-target,install,net-meta,pac
k,swap}
...

positional arguments:
{block-meta,curthooks,extract,hook,in-target,install,net-meta,pack,swap}

optional arguments:
-h, --help            show this help message and exit
--showtrace
--verbose, -v
--log-file LOG_FILE

Each of Curtin’s commands have their own help :

ubuntu@ubuntu:~$ sudo -s
root@ubuntu:~# /curtin/bin/curtin install --help
usage: main.py install [-h] [-c FILE] [--set key=val] [source [source ...]]

positional arguments:
source what to install

optional arguments:
-h, --help show this help message and exit
-c FILE, --config FILE
read configuration from cfg
--set key=val define a config variable


Creating Maas’s Curtin preseed commands

Now that we have our Curtin development environment available, we can use it to come up with a set of commands that will be fed to Curtin by Maas when a unit is created.

Maas uses preseed files located in /etc/maas/preseeds on the Maas server. The curtin_userdata preseed file is the one that we will use as a reference to build our set of partitioning commands.  During the testing phase, we will use the -c option of curtin install along with a configuration file that will mimic the behavior of curtin_userdata.

We will also need to add a fake 1TB disk to Curtin’s development environment so we can use it as a partitioning target. So in the development environment, issue the following command :

$ qemu-img create -f qcow2 boot.disk 1000G Formatting ‘boot.disk’, fmt=qcow2 size=1073741824000 encryption=off cluster_size=65536 lazy_refcounts=off

sudo ./tools/launch $BOOTIMG –publish $ROOTTGZ

ubuntu: ubuntu password: passw0rd

ubuntu@ubuntu:~$ sudo -s root@ubuntu:~# cat /proc/partitions

major minor  #blocks  name

253        0    2306048 vda 253        1    2305024 vda1 253       16        426 vdb 253       32 1048576000 vdc 11        0    1048575 sr0

We can see that the 1000G /dev/vdc is indeed present.  Let’s now start to craft the conffile that will receive our partitioning commands. To test the syntax, we will use two simple commands :

root@ubuntu:~# cat << EOF > conffile 
partitioning_commands:
  builtin: []
  01_partition_make_label: ["/sbin/parted", "/dev/vdc", "-s", "'","mklabel","msdos","'"]
  02_partition_make_part: ["/sbin/parted", "/dev/vdc", "-s", "'","mkpart","primary","1049K","538M","'"] 
sources:
  01_primary: http://192.168.0.13:9923//trusty-server-cloudimg-amd64-root.tar.gz
  EOF

The sources: statement is only there to avoid having to repeat the SOURCE portion of the curtin command and is not to be used in the final Maas configuration. The URL is the address of the server from which you are running the Curtin development environment.

WARNING

The builtin [] statement is VERY important. It is there to override Curtin’s native builtin statement which is to partition the disk using “block-meta simple”.  If it is removed, Curtin will overwrite he partitioning with its default configuration. This comes straight from Scott Moser, the main developer behind Curtin.

Now let’s run the Curtin command :

root@ubuntu:~# /curtin/bin/curtin install -c conffile

Curtin will run its installation sequence and you will see a display which you should be familiar with if you installed units with Maas previously.  The command will most probably exit on error, comlaining about the fact that install-grub received an argument that was not a block device. We do not need to worry about that at the motent.

Once completed, have a look at the partitioning of the /dev/vdc device :

root@ubuntu:~# parted /dev/vdc print
Model: Virtio Block Device (virtblk)
Disk /dev/vdc: 1074GB
Sector size (logical/physical): 512B/512B
Partition Table: msdos

Number  Start   End     Size    Type      File system  Flags
1      1049kB  538MB   537MB   primary   ext4

The partitioning commands were successful and we have the /dev/vdc disk properly configured.  Now that we know that the mechanism works, let try with a complete configuration file. I have found that it was preferable to start with a fresh 1TB disk :

root@ubuntu:~# poweroff

$ rm -f boot.img

$ qemu-img create -f qcow2 boot.disk 1000G
Formatting ‘boot.disk’, fmt=qcow2 size=1073741824000 encryption=off cluster_size=65536 lazy_refcounts=off

sudo ./tools/launch $BOOTIMG –publish $ROOTTGZ

ubuntu@ubuntu:~$ sudo -s

root@ubuntu:~# cat << EOF > conffile 
partitioning_commands:
  builtin: [] 
  01_partition_announce: ["echo", "'### Partitioning disk ###'"]
  01_partition_make_label: ["/sbin/parted", "/dev/vda", "-s", "'","mklabel","msdos","'"]
  02_partition_make_part: ["/sbin/parted", "/dev/vda", "-s", "'","mkpart","primary","1049k","538M","'"]
  02_partition_set_flag: ["/sbin/parted", "/dev/vda", "-s", "'","set","1","boot","on","'"]
  04_partition_make_part: ["/sbin/parted", "/dev/vda", "-s", "'","mkpart","primary","538M","4538M","'"]
  05_partition_make_part: ["/sbin/parted", "/dev/vda", "-s", "'","mkpart","extended","4538M","1000G","'"]
  06_partition_make_part: ["/sbin/parted", "/dev/vda", "-s", "'","mkpart","logical","25.5G","57G","'"]
  07_partition_make_part: ["/sbin/parted", "/dev/vda", "-s", "'","mkpart","logical","57G","89G","'"]
  08_partition_make_part: ["/sbin/parted", "/dev/vda", "-s", "'","mkpart","logical","89G","1000G","'"]
  09_partition_announce: ["echo", "'### Creating filesystems ###'"]
  10_partition_make_fs: ["/sbin/mkfs", "-t", "ext4", "/dev/vda1"]
  11_partition_label_fs: ["/sbin/e2label", "/dev/vda1", "cloudimg-boot"]
  12_partition_make_fs: ["/sbin/mkfs", "-t", "ext4", "/dev/vda2"]
  13_partition_label_fs: ["/sbin/e2label", "/dev/vda2", "cloudimg-rootfs"]
  14_partition_mount_fs: ["sh", "-c", "mount /dev/vda2 $TARGET_MOUNT_POINT"]
  15_partition_mkdir: ["sh", "-c", "mkdir $TARGET_MOUNT_POINT/boot"]
  16_partition_mount_fs: ["sh", "-c", "mount /dev/vda1 $TARGET_MOUNT_POINT/boot"]
  17_partition_announce: ["echo", "'### Filling /etc/fstab ###'"]
  18_partition_make_fstab: ["sh", "-c", "echo 'LABEL=cloudimg-rootfs / ext4 defaults 0 0' >> $OUTPUT_FSTAB"]
  19_partition_make_fstab: ["sh", "-c", "echo 'LABEL=cloudimg-boot /boot ext4 defaults 0 0' >> $OUTPUT_FSTAB"]
  20_partition_make_swap: ["sh", "-c", "mkswap /dev/vda6"]
  21_partition_make_fstab: ["sh", "-c", "echo '/dev/vda6 none swap sw 0 0' >> $OUTPUT_FSTAB"]
sources: 01_primary: http://192.168.0.13:9923//trusty-server-cloudimg-amd64-root.tar.gz EOF

You will note that I have added a few statement like [“echo”, “‘### Partitioning disk ###'”] that will display some logs during the execution. Those are not necessary.
Now let’s try a second test with the complete configuration file :

root@ubuntu:~# /curtin/bin/curtin install -c conffile

root@ubuntu:~# parted /dev/vdc print
Model: Virtio Block Device (virtblk)
Disk /dev/vdc: 1074GB
Sector size (logical/physical): 512B/512B
Partition Table: msdos

Number  Start   End     Size    Type      File system  Flags
1      1049kB  538MB   537MB   primary   ext4         boot
2      538MB   4538MB  4000MB  primary   ext4
3      4538MB  1000GB  995GB   extended               lba
5      25.5GB  57.0GB  31.5GB  logical
6      57.0GB  89.0GB  32.0GB  logical
7      89.0GB  1000GB  911GB   logical

We now have a correctly partitioned disk in our development environment. All we need to do now is to carry that over to Maas to see if it works as expected.

Customization of Curtin execution in Maas

The section “How preseeds work in MAAS” give a good outline on how to select the name of the a preseed file to restrict its usage to specific sub-groups of nodes.  In our case, we want our partitioning to apply to only one node : curtintest.  So by following the description in the section “User provided preseeds“, we need to use the following template :

{prefix}_{node_arch}_{node_subarch}_{release}_{node_name}

The fileneme that we need to choose needs to end with our hostname, curtintest. The other elements are :

  • prefix : curtin_userdata
  • osystem : amd64
  • node_subarch : generic
  • release : trusty
  • node_name : curtintest

So according to that, our filename must be curtin_userdata_amd64_generic_trusty_curtintest

On the MAAS server, we do the following :

root@maas17:~# cd /etc/maas/preseeds

root@maas17:~# cp curtin_userdata curtin_userdata_amd64_generic_trusty_curtintest

We now edit this newly created file and add our previously crafted Curtin configuration file just after the following block :

{{if third_party_drivers and driver}}
  early_commands:
  {{py: key_string = ''.join(['\\x%x' % x for x in map(ord, driver['key_binary'])])}}
  driver_00_get_key: /bin/echo -en '{{key_string}}' > /tmp/maas-{{driver['package']}}.gpg
  driver_01_add_key: ["apt-key", "add", "/tmp/maas-{{driver['package']}}.gpg"]
  driver_02_add: ["add-apt-repository", "-y", "deb {{driver['repository']}} {{node.get_distro_series()}} main"]
  driver_03_update_install: ["sh", "-c", "apt-get update --quiet && apt-get --assume-yes install {{driver['package']}}"]
  driver_04_load: ["sh", "-c", "depmod && modprobe {{driver['module']}}"]
  {{endif}}

The complete section should look just like this :

{{if third_party_drivers and driver}}
  early_commands:
  {{py: key_string = ''.join(['\\x%x' % x for x in map(ord, driver['key_binary'])])}}
   driver_00_get_key: /bin/echo -en '{{key_string}}' > /tmp/maas-{{driver['package']}}.gpg
   driver_01_add_key: ["apt-key", "add", "/tmp/maas-{{driver['package']}}.gpg"]
   driver_02_add: ["add-apt-repository", "-y", "deb {{driver['repository']}} {{node.get_distro_series()}} main"]
   driver_03_update_install: ["sh", "-c", "apt-get update --quiet && apt-get --assume-yes install {{driver['package']}}"]
   driver_04_load: ["sh", "-c", "depmod && modprobe {{driver['module']}}"]
  {{endif}}
  partitioning_commands:
   builtin: []
   01_partition_announce: ["echo", "'### Partitioning disk ###'"]
   01_partition_make_label: ["/sbin/parted", "/dev/vda", "-s", "'","mklabel","msdos","'"]
   02_partition_make_part: ["/sbin/parted", "/dev/vda", "-s", "'","mkpart","primary","1049k","538M","'"]
   02_partition_set_flag: ["/sbin/parted", "/dev/vda", "-s", "'","set","1","boot","on","'"]
   04_partition_make_part: ["/sbin/parted", "/dev/vda", "-s", "'","mkpart","primary","538M","4538M","'"]
   05_partition_make_part: ["/sbin/parted", "/dev/vda", "-s", "'","mkpart","extended","4538M","1000G","'"]
   06_partition_make_part: ["/sbin/parted", "/dev/vda", "-s", "'","mkpart","logical","25.5G","57G","'"]
   07_partition_make_part: ["/sbin/parted", "/dev/vda", "-s", "'","mkpart","logical","57G","89G","'"]
   08_partition_make_part: ["/sbin/parted", "/dev/vda", "-s", "'","mkpart","logical","89G","1000G","'"]
   09_partition_announce: ["echo", "'### Creating filesystems ###'"]
   10_partition_make_fs: ["/sbin/mkfs", "-t", "ext4", "/dev/vda1"]
   11_partition_label_fs: ["/sbin/e2label", "/dev/vda1", "cloudimg-boot"]
   12_partition_make_fs: ["/sbin/mkfs", "-t", "ext4", "/dev/vda2"]
   13_partition_label_fs: ["/sbin/e2label", "/dev/vda2", "cloudimg-rootfs"]
   14_partition_mount_fs: ["sh", "-c", "mount /dev/vda2 $TARGET_MOUNT_POINT"]
   15_partition_mkdir: ["sh", "-c", "mkdir $TARGET_MOUNT_POINT/boot"]
   16_partition_mount_fs: ["sh", "-c", "mount /dev/vda1 $TARGET_MOUNT_POINT/boot"]
   17_partition_announce: ["echo", "'### Filling /etc/fstab ###'"]
   18_partition_make_fstab: ["sh", "-c", "echo 'LABEL=cloudimg-rootfs / ext4 defaults 0 0' >> $OUTPUT_FSTAB"]
   19_partition_make_fstab: ["sh", "-c", "echo 'LABEL=cloudimg-boot /boot ext4 defaults 0 0' >> $OUTPUT_FSTAB"]
   20_partition_make_swap: ["sh", "-c", "mkswap /dev/vda6"]
   21_partition_make_fstab: ["sh", "-c", "echo '/dev/vda6 none swap sw 0 0' >> $OUTPUT_FSTAB"]

Now that maas is properly configured for curtintest, complete the test by deploying a charm in a Juju environment where curtintest is properly comissionned.  In that example, curtintest is the only available node so maas will systematically pick it up :

caribou@avogadro:~$ juju status
environment: maas17
machines:
“0”:
agent-state: started
agent-version: 1.24.0
dns-name: state-server.maas
instance-id: /MAAS/api/1.0/nodes/node-2555c398-1bf9-11e5-a7c4-525400214658/
series: trusty
hardware: arch=amd64 cpu-cores=1 mem=1024M
state-server-member-status: has-vote
services: {}
networks:
maas-eth0:
provider-id: maas-eth0
cidr: 192.168.100.0/24

caribou@avogadro:~$ juju deploy mysql
Added charm “cs:trusty/mysql-25” to the environment.

Once the mysql charm has been deployed, connect to the unit to confirm that the partitioning was successful

caribou@avogadro:~$ juju ssh mysql/0
ubuntu@curtintest:~$ sudo -s
root@curtintest:~# parted /dev/vda print
Model: Virtio Block Device (virtblk)
Disk /dev/vda: 1074GB
Sector size (logical/physical): 512B/512B
Partition Table: msdos
 
Number  Start   End     Size    Type      File system  Flags
1      1049kB  538MB   537MB   primary   ext4         boot
2      538MB   4538MB  4000MB  primary   ext4
3      4538MB  1000GB  995GB   extended               lba
5      25.5GB  57.0GB  31.5GB  logical
6      57.0GB  89.0GB  32.0GB  logical
7      89.0GB  1000GB  911GB   logical
ubuntu@curtintest:~$ swapon -s
Filename Type Size Used Priority
/dev/vda6 partition 31249404 0 -1

Conclusion

Customizing disks and partition using curtin is possible but currently not sufficiently documented. I hope that this write up will be helpful.  Sustained development on Curtin is currently done to improve these functionalities so things will definitively get better.

Publié dans Canonical, Cloud, Technical, Ubuntu Server | 4 commentaires

iSCSI and Device mapper Multipath test setup

I have seen this setup documented a few places, but not for Ubuntu so here it goes.

I have used this many time to verify or diagnose Device Mapper Multipath (DM-MPIO) since it is rather easy to fail a path by switching off one of the network interfaces. Nowaday, I use two KVM virtual machines with two NIC each.

Those steps have been tested on Ubuntu 12.04 (Precise) and Ubuntu 14.04 (Trusty). The DM-MPIO section is mostly a cut and paste of the Ubuntu Server Guide

The virtual machine that will act as the iSCSI target provider is called PreciseS-iscsitarget. The VM that will connect to the target is called PreciseS-iscsi. Each one is configured with two network interfaces (NIC) that get their IP addresses from DHCP. Here is an example of the network configuration file :

$ cat /etc/network/interfaces
# The loopback network interface
auto lo
iface lo inet loopback

# The primary network interface
auto eth0
iface eth0 inet dhcp
#
auto eth1
iface eth1 inet dhcp

The second NIC resolves to the same hostname with a “2” appended (i.e. PreciseS-iscsitarget2 and PreciseS-iscsi2)

Setting up the iSCSI Target VM

This is done by installing the following packages :

$ sudo apt-get install iscsitarget iscsitarget-dkms

Edit /etc/default/iscsitarget and change the following line to enable the service :

ISCSITARGET_ENABLE=true

We now proceed to create an iSCSI target (aka disk). This is done by creating a 50 Gb sparse file that will act as our disk :

$ sudo dd if=/dev/zero of=/home/ubuntu/iscsi_disk.img count=0 obs=1 seek=50G

This container is used in the definition of the iSCSI target. Edit the file /etc/iet/ietd.conf. At the bottom, add :

Target iqn.2014-09.PreciseS-iscsitarget:storage.sys0
        Lun 0 Path=/home/ubuntu/iscsi_disk.img,Type=fileio,ScsiId=lun0,ScsiSN=lun0

The iSCSI target service must be restarted for the new target to be accessible

$ sudo service iscsitarget restart


Setting up the iSCSI initiator

To be able to access the iSCSI target, only one package is required :

$ sudo apt-get install open-iscsi

Edit /etc/iscsi/iscsid.conf changing the following:

node.startup = automatic

This will ensure that the iSCSI targets that we discover are enabled automatically upon reboot.

Now we will proceed to discover and connect to the device that we setup in the previous section

$ sudo iscsiadm -m discovery -t st -p PreciseS-iscsitarget
$ sudo iscsiadm -m node --login
$ dmesg | tail
[   68.461405] iscsid (1458): /proc/1458/oom_adj is deprecated, please use /proc/1458/oom_score_adj instead.
[  189.989399] scsi2 : iSCSI Initiator over TCP/IP
[  190.245529] scsi 2:0:0:0: Direct-Access     IET      VIRTUAL-DISK     0    PQ: 0 ANSI: 4
[  190.245785] sd 2:0:0:0: Attached scsi generic sg0 type 0
[  190.249413] sd 2:0:0:0: [sda] 104857600 512-byte logical blocks: (53.6 GB/50.0 GiB)
[  190.250487] sd 2:0:0:0: [sda] Write Protect is off
[  190.250495] sd 2:0:0:0: [sda] Mode Sense: 77 00 00 08
[  190.251998] sd 2:0:0:0: [sda] Write cache: disabled, read cache: enabled, doesn't support DPO or FUA
[  190.257341]  sda: unknown partition table
[  190.258535] sd 2:0:0:0: [sda] Attached SCSI disk

We can see in the dmesg output that the new device /dev/sda has been discovered. Format the new disk & create a file system. Then verify that everything is correct by mounting and unmounting the new file system.

$ fdisk /dev/sda
n
p
1
<ret>
<ret>
w
$  mkfs -t ext4 /dev/sda1
$ mount /dev/sda1 /mnt
$ umount /mnt


Setting up DM-MPIO

Since each of our virtual machines have been configured with two network interfaces, it is possible to reach the iSCSI target through the second interface :

$ iscsiadm -m discovery -t st -p
192.168.1.193:3260,1 iqn.2014-09.PreciseS-iscsitarget:storage.sys0
192.168.1.43:3260,1 iqn.2014-09.PreciseS-iscsitarget:storage.sys0
$ iscsiadm -m node -T iqn.2014-09.PreciseS-iscsitarget:storage.sys0 --login

Now that we have two paths toward our iSCSI target, we can proceed to setup DM-MPIO.

First of all, a /etc/multipath.conf file must exist.  Then we install the needed package :

$ sudo -s
# cat << EOF > /etc/multipath.conf
defaults {
        user_friendly_names yes
}
EOF
# exit
$ sudo apt-get -y install multipath-tools

Two paths to the iSCSI device created previously need to exist for the multipath device to be seen.

# multipath -ll
mpath0 (149455400000000006c756e30000000000000000000000000) dm-2 IET,VIRTUAL-DISK
size=50G features='0' hwhandler='0' wp=rw
|-+- policy='round-robin 0' prio=1 status=active
| `- 4:0:0:0 sda 8:0   active ready  running
`-+- policy='round-robin 0' prio=1 status=enabled
  `- 5:0:0:0 sdb 8:16  active ready  running

The two paths are indeed visible. We can move forward and verify that the partition table created previously is accessible :

$ sudo fdisk -l /dev/mapper/mpath0

Disk /dev/mapper/mpath0: 53.7 GB, 53687091200 bytes
64 heads, 32 sectors/track, 51200 cylinders, total 104857600 sectors
Units = sectors of 1 * 512 = 512 bytes
Sector size (logical/physical): 512 bytes / 512 bytes
I/O size (minimum/optimal): 512 bytes / 512 bytes
Disk identifier: 0x0e5e5db1

              Device Boot      Start         End      Blocks   Id  System
/dev/mapper/mpath0p1            2048   104857599    52427776   83  Linux

All that is remaining is to add an entry to the /etc/fstab file so the file system that we created is mounted automatically at boot.  Notice the _netdev entry : this is required otherwise the iSCSI device will not be mounted.

$ sudo -s
# cat << EOF >> /etc/fstab
/dev/mapper/mpath0-part1        /mnt    ext4    defaults,_netdev        0 0
EOF
exit
$ sudo mount -a
$ df /mnt
Filesystem               1K-blocks   Used Available Use% Mounted on
/dev/mapper/mpath0-part1  51605116 184136  48799592   1% /mnt
Publié dans Canonical, Industry, Technical, Ubuntu Server | Laisser un commentaire

Ubuntu Trusty on the Elitebook EVO 850

After three years of hard work, it is time to retire my 8440p and let the family enjoy its availability. For my new workhorse, I have chosen the HP Elitebook EVO 850 that fit my budget and performance requirement.

TL;DR : The Elitebook EVO 850 basic functionalities work fine with Ubuntu 14.04.1

Before hosing the Windows 7 installation, I thought of testing the basic functionalities. So after booting Win7 I checked that most of the thing (sound, light, webcam, etc) did work as expected.

Never underestimate the power of the bug : if there is some hardware issue, then it is better to do a first diagnostic on Windows. The HP tech will love you for that (been there, done that). Otherwise, there will always be a doubt that Ubuntu is the culprit & they will not try to look any further.

After a successful Windows boot, I created a bootable USB stick with the latest Ubuntu release on it to verify that Ubuntu itself runs fine. No need to wipe out Windows and install Ubuntu on it only to find out that the hardware fails miserably. Here is the command I used to create the bootable USB stick, since the USB creator has been buggy for years on Ubuntu :

$ dd if=ubuntu-14.04.1-desktop-amd64.iso of=/dev/sdc bs=4M

One important note : this is a laptop that is factory installed with a secure boot configuration in the BIOS. I did not have to change anything to boot Ubuntu so you should not have to.

Since everything looked good, I went ahead & restarted the laptop & installed Ubuntu Trusty Tahr 14.04..1 on the laptop, using a full disk install with full disk encryption.  Installation was flawless and completed in less than five minutes, thanks to the 250Gb SSD drive !

Publié dans Technical, Ubuntu Desktop | Un commentaire

remote kernel crash dump : More testing needed

A couple of weeks ago I announced that I was working on a new remote functionality for kdump-tools, the kernel crash dump tool used on Debian and Ubuntu.

I am now done with the development of the new functionality, so the package is ready for testing. If you are interested, just read the previous post which has all the gory details on how to set it up & test it.

Publié dans Technical, Ubuntu Server | Un commentaire

remote kernel crash dump for Debian and Ubuntu

A few years ago, while I started to participate to the packaging of makedumpfile and kdump-tools for Debian and ubuntu. I am currently applying for the formal status of Debian Maintainer to continue that task.

For a while now, I have been noticing that our version of the kernel dump mechanism was lacking from a functionality that has been available on RHEL & SLES for a long time : remote kernel crash dumps. On those distribution, it is possible to define a remote server to be the receptacle of the kernel dumps of other systems. This can be useful for centralization or to capture dumps on systems with limited or no local disk space.

So I am proud to announce the first functional beta-release of kdump-tools with remote kernel crash dump functionality for Debian and Ubuntu !

For those of you eager to test or not interested in the details, you can find a packaged version of this work in a Personal Package Archive (PPA) here :

https://launchpad.net/~louis-bouchard/+archive/networked-kdump

New functionality : remote SSH and NFS

In the current version available in Debian and Ubuntu, the kernel crash dumps are stored on local filesystems. Starting with version 1.5.1, they are stored in a timestamped directory under /var/crash. The new functionality allow to either define a remote host accessible through SSH or an NFS mount point to be the receptacle for the kernel crash dumps.

A new section of the /etc/default/kdump-tools file has been added :

# ---------------------------------------------------------------------------
# Remote dump facilities:
# SSH - username and hostname of the remote server that will receive the dump
# and dmesg files.
# SSH_KEY - Full path of the ssh private key to be used to login to the remote
# server. use kdump-config propagate to send the public key to the
# remote server
# HOSTTAG - Select if hostname of IP address will be used as a prefix to the
# timestamped directory when sending files to the remote server.
# 'ip' is the default.
# NFS - Hostname and mount point of the NFS server configured to receive
# the crash dump. The syntax must be {HOSTNAME}:{MOUNTPOINT} 
# (e.g. remote:/var/crash)
#
# SSH="<user@server>"
#
# SSH_KEY="<path>"
#
# HOSTTAG="hostname|[ip]"
# 
# NFS="<nfs mount>"
#

The kdump-config command also gains a new option : propagate which is used to send a public ssh key to the remote server so passwordless ssh commands can be issued to the remote SSH host.

Those options and commands are nothing new : I simply based my work on existing functionality from RHEL & SLES. So if you are well acquainted with RHEL remote kernel crash dump mechanisms, you will not be lost on Debian and Ubuntu. So I want to thank those who built the functionality on those distributions; it was a great help in getting them ported to Debian.

Testing on Debian

First of all, you must enable the kernel crash dump mechanism at the kernel level. I will not go in details as it is slightly off topic but you should :

  1. Add crashkernel=128M to /etc/default/grub in GRUB_CMDLINE_LINUX_DEFAULT
  2. Run udpate-grub
  3. reboot

Install the beta packages

The package in the PPA can be installed on Debian with add-apt-repository. This command is in the software-properties-common package so you will have to install it first :

$ apt-get install software-properties-common
$ add-apt-repository ppa:louis-bouchard/networked-kdump

Since you are on Debian, the result of the last command will be wrong, as the serie defined in the PPA is for Utopic. Just use the following command to fix that :

$ sed -i -e 's/sid/utopic/g' /etc/apt/sources.list.d/louis-bouchard-networked-kdump-sid.list 
$ apt-get update
$ apt-get install kdump-tools makedumpfile

Configure kdump-tools for remote SSH capture

Edit the file /etc/default/kdump-tools and enable the kdump mechanism by setting USE_KDUMP to 1 . Then set the SSH variable to the remote hostname & credentials that you want to use to send the kernel crash dump. Here is an example :

USE_KDUMP=1
...
SSH="ubuntu@TrustyS-netcrash"

You will need to propagate the ssh key to the remote SSH host, so make sure that you have the password of the remote server’s user you defined (ubuntu in my case) for this command :

root@sid:~# kdump-config propagate
Need to generate a new ssh key...
The authenticity of host 'trustys-netcrash (192.168.122.70)' can't be established.
ECDSA key fingerprint is 04:eb:54:de:20:7f:e4:6a:cc:66:77:d0:7c:3b:90:7c.
Are you sure you want to continue connecting (yes/no)? yes
ubuntu@trustys-netcrash's password: 
propagated ssh key /root/.ssh/kdump_id_rsa to server ubuntu@TrustyS-netcrash

If you have an existing ssh key that you want to use, you can use the SSH_KEY option to point to your own key in /etc/default/kdump-tools :

SSH_KEY="/root/.ssh/mykey_id_rsa"

Then run the propagate command as previously :

root@sid:~/.ssh# kdump-config propagate
Using existing key /root/.ssh/mykey_id_rsa
ubuntu@trustys-netcrash's password: 
propagated ssh key /root/.ssh/mykey_id_rsa to server ubuntu@TrustyS-netcrash

It is a safe practice to verify that the remote SSH host can be accessed without password. You can use the following command to test (with your own remote server as defined in the SSH variable in /etc/default/kdump-tools) :

root@sid:~/.ssh# ssh -i /root/.ssh/mykey_id_rsa ubuntu@TrustyS-netcrash pwd
/home/ubuntu

If the passwordless connection can be achieved, then everything should be all set. You can proceed with a real crash dump test if your setup allows for it (not a production environment for instance).

Configure kdump-tools for remote NFS capture

Edit the /etc/default/kdump-tools file and set the NFS variable with the NFS mount point that will be used to transfer the crash dump :

NFS="TrustyS-netcrash:/var/crash"

The format needs to be the syntax that normally would be used to mount the NFS filesystem. You should test that your NFS filesystem is indeed accessible by mounting it manually :

root@sid:~/.ssh# mount -t nfs TrustyS-netcrash:/var/crash /mnt
root@sid:~/.ssh# df /mnt
Filesystem 1K-blocks Used Available Use% Mounted on
TrustyS-netcrash:/var/crash 6815488 1167360 5278848 19% /mnt
root@sid:~/.ssh# umount /mnt

Once you are sure that your NFS setup is correct, then you can proceed with a real crash dump test.

Testing on Ubuntu

As you would expect, setting things on Ubuntu is quite similar to Debian.

Install the beta packages

The package in the PPA can be installed on Debian with add-apt-repository. This command is in the software-properties-common package so you will have to install it first :

$ sudo add-apt-repository ppa:louis-bouchard/networked-kdump

Packages are available for Trusty and Utopic.

$ sudo apt-get update
$ sudo apt-get -y install linux-crashdump

Configure kdump-tools for remote SSH capture

Edit the file /etc/default/kdump-tools and enable the kdump mechanism by setting USE_KDUMP to 1 . Then set the SSH variable to the remote hostname & credentials that you want to use to send the kernel crash dump. Here is an example :

USE_KDUMP=1
...
SSH="ubuntu@TrustyS-netcrash"

You will need to propagate the ssh key to the remote SSH host, so make sure that you have the password of the remote server’s user you defined (ubuntu in my case) for this command :

ubuntu@TrustyS-testdump:~$ sudo kdump-config propagate
[sudo] password for ubuntu: 
Need to generate a new ssh key...
The authenticity of host 'trustys-netcrash (192.168.122.70)' can't be established.
ECDSA key fingerprint is 04:eb:54:de:20:7f:e4:6a:cc:66:77:d0:7c:3b:90:7c.
Are you sure you want to continue connecting (yes/no)? yes
ubuntu@trustys-netcrash's password: 
propagated ssh key /root/.ssh/kdump_id_rsa to server ubuntu@TrustyS-netcrash
ubuntu@TrustyS-testdump:~$
If you have an existing ssh key that you want to use, you can use the SSH_KEY option to point to your own key in /etc/default/kdump-tools :
SSH_KEY="/root/.ssh/mykey_id_rsa"

Then run the propagate command as previously :

ubuntu@TrustyS-testdump:~$ kdump-config propagate
Using existing key /root/.ssh/mykey_id_rsa
ubuntu@trustys-netcrash's password: 
propagated ssh key /root/.ssh/mykey_id_rsa to server ubuntu@TrustyS-netcrash

It is a safe practice to verify that the remote SSH host can be accessed without password. You can use the following command to test (with your own remote server as defined in the SSH variable in /etc/default/kdump-tools) :

ubuntu@TrustyS-testdump:~$sudo ssh -i /root/.ssh/mykey_id_rsa ubuntu@TrustyS-netcrash pwd
/home/ubuntu

If the passwordless connection can be achieved, then everything should be all set.

Configure kdump-tools for remote NFS capture

Edit the /etc/default/kdump-tools file and set the NFS variable with the NFS mount point that will be used to transfer the crash dump :

NFS="TrustyS-netcrash:/var/crash"

The format needs to be the syntax that normally would be used to mount the NFS filesystem. You should test that your NFS filesystem is indeed accessible by mounting it manually (you might need to install the nfs-common package) :

ubuntu@TrustyS-testdump:~$ sudo mount -t nfs TrustyS-netcrash:/var/crash /mnt 
ubuntu@TrustyS-testdump:~$ df /mnt
Filesystem 1K-blocks Used Available Use% Mounted on
TrustyS-netcrash:/var/crash 6815488 1167488 5278720 19% /mnt
ubuntu@TrustyS-testdump:~$ sudo umount /mnt

Once you are sure that your NFS setup is correct, then you can proceed with a real crash dump test.

 Miscellaneous commands and options

A few other things are under the control of the administrator

The HOSTTAG modifier

When sending the kernel crash dump, kdump-config will use the IP address of the server to as a prefix to the timestamped directory on the remote host. You can use the HOSTTAG variable to change that default. Simply define in /etc/default/kdump-tools :

HOSTTAG="hostname"

The hostname of the server will be used as a prefix instead of the IP address.

Currently, this is only implemented for the SSH method, but it will be available for NFS as well in the final version.

kdump-config show

To verify the configuration that you have defined in /etc/default/kdump-tools, you can use kdump-config’s show command to review your options.

ubuntu@TrustyS-testdump:~$ sudo kdump-config show
USE_KDUMP: 1
KDUMP_SYSCTL: kernel.panic_on_oops=1
KDUMP_COREDIR: /var/crash
crashkernel addr: 0x2d000000
SSH: ubuntu@TrustyS-netcrash
SSH_KEY: /root/.ssh/kdump_id_rsa
HOSTTAG: ip
current state: ready to kdump
kexec command:
 /sbin/kexec -p --command-line="BOOT_IMAGE=/vmlinuz-3.13.0-24-generic root=/dev/mapper/TrustyS--vg-root ro console=ttyS0,115200 irqpoll maxcpus=1 nousb" --initrd=/boot/initrd.img-3.13.0-24-generic /boot/vmlinuz-3.13.0-24-generic

If the remote crash kernel dump functionality is setup, you will see the options listed in the output of the commands.

Conclusion

As outlined at the beginning, this is the first functional beta version of the code. If you are curious, you can find the code I am working on here :

http://anonscm.debian.org/gitweb/?p=collab-maint/makedumpfile.git;a=shortlog;h=refs/heads/networked_kdump_beta1

Don’t hesitate to test & let me know if you find issues

Publié dans Canonical, Technical, Ubuntu Server | Laisser un commentaire